Arrowwood Tote Variations - a free pattern hack tutorial
We are obsessed with the Arrowwood Tote! With it's simple construction and gentle curvature, it is endlessly variable using different materials, colors, and designs.
Those large quilted main panels just beg for customization. Today, we're bringing you THREE pattern hacks that you can use to make the Arrowwood uniquely yours!
(If you prefer a printer-friendly version of all the information below, we have one available for a small fee in the Pattern Shop.)
Patchwork Squares - convert the main panels and/or inside pockets into colorful grids made from 2 1/2" squares cut from a single charm pack.
Sawtooth Star Block Insert - make an 8" classic Sawtooth Star block panel for each side of your bag. Or substitute any block of your choice!
Strap Modification - have a different idea? Use this strap variation for any motif or block you don't want to cover with webbing.

Before beginning:
- This tutorial is meant to be an add-on to the Arrowwood Tote pattern, available in the Pattern Shop as a PDF instant download or a printed paper pattern mailed to you.
- Read through all instructions before beginning.
- Tutorial assumes the reader is familiar with the Arrowwood pattern and is able to calculate necessary fabric requirements when deviating from the pattern.


Patchwork Squares
Material Requirements
- MAIN fabric: 3/4 yard + one charm pack (40 5” squares)
- All other materials per the pattern.
Cutting Instructions
MAIN fabric
Choose your favorite 40 squares from the charm pack and sub-cut each one into four 2 1/2” squares. Total 2 1/2” squares: 158
TIP: It’s much easier to distribute color and pattern evenly across both patchwork panels and pockets if, after cutting the charm squares, you separate all your 2 1/2” squares into stacks of matching prints.
Omitting the MAIN PANELS, follow the pattern diagram and cut the remaining pieces listed.
LINING fabric
Change the ZIPPER POCKET BOTTOM measurements in the pattern to 7 1/2” x 9”. Follow the pattern diagram and cut all the remaining pieces listed.

Patchwork Panel Assembly
Lay out 64 squares in an 8 x 8 grid. Repeat for a second grid. TIP: to have matching panels, lay out two grids at the same time, side by side.
Sew squares into rows with a 1/4” seam. Press each row in opposite directions.
Sew rows together to make a large patchwork square. Press any direction.
Your patchwork panel can now be used as your MAIN PANEL in the pattern. It’s slightly oversized, but will be trimmed to size later in the pattern.


Patchwork Pockets
Lay out 15 squares in a 5 x 3 grid. Repeat for a second grid. TIP: again, to have matching pockets, lay out two grids at the same time side by side.
Sew squares into rows with a 1/4” seam. Press each row in opposite directions.
Sew rows together to make a patchwork rectangle. Press any direction.
Line up the 7 1/2” x 9” ZIPPER POCKET BOTTOM cut from the LINING fabric with the top edge of the patchwork rectangle - right sides together.
Sew together and press towards the LINING fabric. Trim to a 9” x 13” rectangle. Fold the entire unit in half - wrong sides together - and press the crease.
To further secure the patchwork seams, consider adding some quilting. In this version, we added three horizontal lines of stitching in-the-ditch to secure the patchwork to the fabric behind. This entire piece is referred to as the ZIPPER POCKET BOTTOM in the pattern.


--------------------------------------------------------

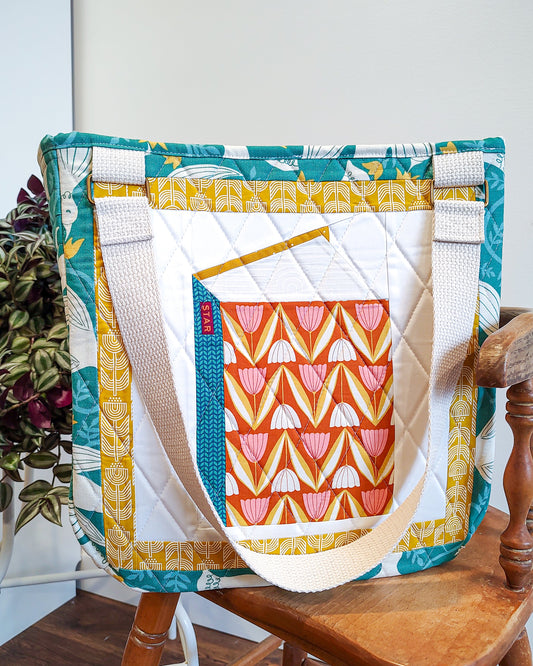
Sawtooth Star - 8" Block Insert
This variation shows you how to make and insert an 8” Sawtooth Star block on both sides of your Arrowwood Tote. Or - substitute the star with any other block of your choice!
Material Requirements
- ACCENT fabric (for the block): one fat quarter, or at least a 10” x 15” rectangle
- All other materials per the pattern.
Cutting Instructions
ACCENT fabric
Using the suggested cutting diagram, sub-cut the fat quarter into
- Two 4 1/2” squares
- Sixteen 2 1/2” squares

MAIN fabric
Omitting the MAIN PANELS, cut all other pieces per the pattern PLUS the pieces listed below. Since cutting is tight, a suggested cutting diagram is provided with the extra pieces highlighted.
- Four 4 1/4’’ x 16” rectangles
- Four 4 1/4” x 8 1/2” rectangles
- Eight 2 1/2” squares
- Eight 2 1/2” x 4 1/2” rectangles

Assembly
1. Place a 2 1/2” square of ACCENT fabric RST with a 2 1/2” x 4 1/2” rectangle of MAIN fabric. Draw a line corner to corner on the square and sew precisely down the line.
2. Trim 1/4” from the line and discard the corner. Press towards the ACCENT fabric.
3. Repeat Steps 1 and 2 on the other corner of the 2 1/2” x 4 1/2” rectangle of MAIN fabric.
4. Repeat Steps 1-3 to make four flying geese units.

5. Using the 2 1/2” squares of MAIN fabric in the corners and the 4 1/2” square of ACCENT fabric in the middle, assemble the final block as shown. Press in the direction indicated by the arrows.

6. Sew a 4 1/4” x 8 1/2” rectangle of MAIN fabric to the top and bottom of the sawtooth star. Press towards the MAIN fabric.
7. Sew a 4 1/4” x 16” rectangle of MAIN fabric to each side. Press towards the MAIN fabric. Your star panel can now be used as your MAIN PANEL in the pattern!
8. Repeat Steps 1-8 to make a second sawtooth star panel.

Other blocks:
Use any size block you'd like - we recommend a maximum of 12" for any design you don't want to be impacted by trimming. Your panel will start at 16" for quilting , but then is trimmed to a 14 1/2" before cutting the bottom curves.
--------------------------------------------------------

Strap Modification
If you have a large motif you don’t want to cover with webbing - here’s a simple strap modification to shorten the webbing over the main panels.
Cutting Instructions
- 3” of webbing x 4 - substitute for the 15” straps in the pattern
- All other materials and cutting per the pattern
Assembly
1. Align the 3” piece of webbing 1 1/4” from the side of the MAIN PANEL. Pin or baste in place with 1/8” top stitch.

2. On the webbing, mark 1 1/4” down from the top edge of the panel. Stitch 3-4 times across this line.

3. Slide the RECTANGLE RING on the bottom tail of the webbing. Fold the webbing up, pulling any excess past the top of the bag.

4. Top stitch the webbing in place with an 1/8” seam allowance. Trim any excess webbing flush with the top of the panel.
5. Continue the pattern as written to attach the shoulder straps and box stitch.

Use this tutorial as a jumping off point to customize your tote with all sorts of ideas!
- Instead of 2 1/2" squares use 2 1/2" strips.
- Instead of fusing or basting your foam - use a quilt-as-you-go method for a panel free of visible stitching!
Whatever you make, we'd LOVE to see it - tag us on social @thejunethimble so we can see your totes!
Happy sewing!
Rebecca and Cait

Pattern Details:
Whether it's full of travel snacks and a blanket, loaded for a crafting retreat, toting books home from the library, or stuffed with jackets and lunchboxes - the Arrowwood Tote will stand up to the task.
Tote size: 14" x 7" x 14" (L x W x H)
With thoughtful design features like:
- Not one, but TWO zippered pockets easily accessible from the top of the bag
- A D-ring to tether your keys or sunglasses
- Slim side pockets on the outside...AND the inside…large enough to carry a water bottle.
Find the Arrowwood Tote Bag in the Pattern Shop as an Instant Download or Printed Pattern.